On-line User Guide
Note:
- This is a condensed version of the Manual.
- The full version is on the CD-ROM provided with your Network Storage
Link.
- For information about each screen, please use the help button and
file.
Contents
Getting Familiar with
the Network Storage Link
Please take a few minutes to familiarize yourself with your new Network
Storage Link.
Important !
- The Network Storage Link must be powered down correctly. While On,
pressing the power switch for 3 seconds will start the shutdown process.
Do not disconnect (or switch off) power to the Network Storage Link
before the shutdown is complete.
Front Panel
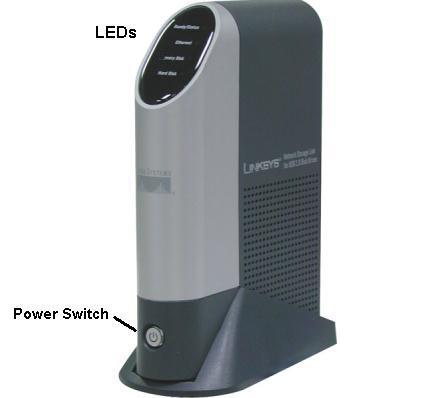
Front Panel
The front panel has 4 LEDs and one Power Switch.
The power switch is a "soft switch".
- If the Network Storage Link is powered off, you can start it up by
briefly pressing the power switch.
- To power down the Network Storage Link, press the power switch, and
wait for the shutdown process to be completed. Upon completion, all LEDs
will turn Off.
LED Operation
LED operation is described in the following table.
Note that the
"Ready/Status" LED has 2 colors - Green (Ready) and Amber (Status). These
are listed separately.
| LED |
Function |
|
Ready LED (Green) |
ON - normal operation
OFF - no power
Blinking - This LED blinks during startup and shutdown.
|
|
Status LED (Amber) |
ON - This LED will be On during the Startup self-test; it will
turn Off once the self-test is completed. If it stays ON, there is a
hardware error.
OFF - normal operation
Blinking - During a software upgrade, both the Status
and Ready LEDs will blink. |
|
Ethernet |
ON - Link established.
OFF - No LAN connection.
Blinking - Data is transmitted or received via the LAN.
|
|
Disk 2 |
ON - Flash drive or Hard Disk in the Upper USB port is
available.
OFF - No drive installed.
Slow Blinking - Flash drive can be removed.
Fast Blinking - Data is being transferred to or from the flash
drive. |
|
Disk 1 |
ON - USB Hard Disk Drive connected to the Lower USB port is
available.
OFF - No USB drive installed.
Fast Blinking - Data is being transferred to or from the USB
Hard Disk Drive. |
Rear Panel
All ports and connectors are on the rear panel.
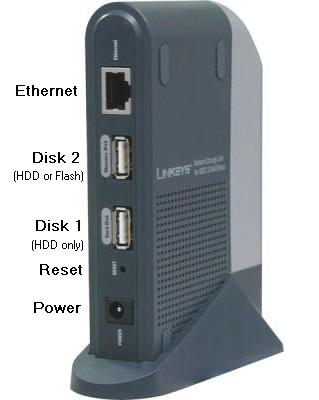
Network Storage Link Rear Panel
| Component |
Description |
|
Ethernet connector
|
Use this to connect the Network Storage Link to your LAN.
|
|
Disk 2 |
Connect your USB Flash Drive (USB key) or USB disk
here. |
|
Disk 1 |
Connect your USB Hard Disk Drive here. (Do NOT
connect a Flash Drive here; it will not be recognized.) |
|
Reset Button
(IP/Password) |
This button has 2 functions:
- If the Network Storage Link's IP Address is lost, press and
hold this button for 2 seconds. The IP Address will be set to the
default value of 192.168.1.77 and it will beep once to indicate
the reset has occurred.
- If the Network Storage Link's password is lost, press and hold
this button for 10 seconds. The password will then be set to the
default value of "admin", and the Network Storage Link will beep
again.
|
|
Power Input |
Connect the supplied power adapter here.
|
Audible Warnings
Audible warnings (beeps) will be generated under the following
conditions.
| Audible Warning |
Condition |
|
1 Beep |
Reset button or power switch is pressed. |
|
2 Beeps
Repeated every 5 seconds
for 1 minute.
|
Network Storage Link is a DHCP client, but no DHCP Server
responded to the DHCP client request.
|
Return
to Top of document
Installation
The following section instructs you on how to physically connect the
Network Storage Link to the network, and how to configure the Network
Storage Link for basic operation in your Windows environment. Everything
you need to do to get your Network Storage Link up and running is covered
here.
Connecting
Everything Together and Booting Up
Requirements
The following conditions are required to begin the installation of the
Network Storage Link to your system.
- TCP/IP protocol on your PCs.
- To connect to a network, an available port on a hub or switch.
- To store data, you need a USB flash drive and/or a USB Hard Disk
Drive.
- Flash Drives can only be inserted in the UPPER USB port (Disk 2).
- USB HDDs can be connected to either USB port (Disk 1 or Disk 2)
Hardware Installation
If the above conditions are met, follow the steps below to begin the
installation of your Network Storage Link.
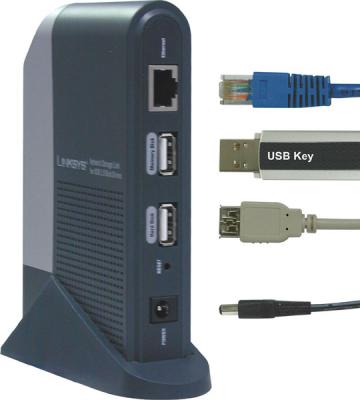
1. Connect the network cable to the Network Storage
Link.
- Locate the RJ45 network cable that came packaged with your Network
Storage Link. Plug it into the RJ45 socket on the Network Storage Link's
rear panel, and connect the other end of the cable to your hub or
switch.
2. Connect the the USB Storage Devices.
- USB flash memory devices (USB Key) can only be inserted in the UPPER
USB port (Disk 2)
- USB Hard Disk Drives can be connected to either USB port (Disk 1 or
Disk 2).
- For details on removing or changing USB storage devices, see the
following section.
3. Connect the power.
- Plug the supplied power cord into the Network Storage Link's power
input, located on the Network Storage Link's rear panel. Connect the
other end of the power cord to a power outlet.
4. Power on.
- The power switch is on the front panel. Press it once to power on
the Network Storage Link.
4. The Network Storage Link's self-test.
- Now that its power is on, the Network Storage Link's boot process
will begin. The Network Storage Link will run a brief self-test (2 or 3
seconds) prior to actually booting up. During the self-test, all of the
Network Storage Link's LEDs will be illuminated or flashing.
6. Booting up.
- When the self-test is complete, the Status (Amber) LED will
turn Off, the Ready (Green) LED will blink continuously, and the
Ethernet LED will blink occasionally. This signifies that the Network
Storage Link is in the actual process of booting up. Boot up should take
approximately 1-3 minutes. It will take longer on the first boot up, and
on any boot up following an improper shutdown.
7. Boot up completed.
- When Boot up is completed, the Ready (Green) LED and the
Ethernet LED will be On.
- If a Flash Memory or USB Disk is connected to the upper USB port,
the Disk 2 LED should be On.
- If a USB HDD is connected to the lower USB port, the Disk 1
LED should be On.
- If the Network Storage Link repeatedly beeps, there is a hardware
problem. Consult this user guide's Troubleshooting section for
possible solutions.
Return
to Top of document
Changing USB Storage Devices
Changing a Flash Memory Disk (Upper USB Port)
Inserting a Flash Memory Disk
You can insert a Flash Memory Disk at any time. Once the "Memory Disk"
LED on the front panel comes on, and stays on, the Flash Memory Disk is
available for use.
Removing a Flash Memory Disk
- Run the Windows utility
- Select "Safely Remove Drive"
- Select the desired Network Storage Link
- Click the "Eject" button.
- Wait for the "Disk 2" LED to start blinking slowly. (The Windows
program will also display a message when it is safe to physically detach
the Flash Memory disk.)
- Remove the Flash Memory Disk.
Note: If the Flash Memory Disk is not removed, it will
not be re-connected. You must remove and re-insert the Flash Memory Disk
to have it re-connected.
Changing a USB Hard Disk Drive
The USB Hard Disk Drive can only be changed when the Network
Storage Link is powered OFF!
While the Network Storage Link is powered Off, you can safely
disconnect an existing USB HDD, and connect the desired USB HDD.
A new USB Hard Disk Drive must be formatted before it can be
used.
- For initial installation, the Windows-based Setup Wizard will check
if the USB HDD has been formatted, and will offer to format the HDD if
it is not yet formatted. The format operation will destroy any
existing data on the disk.
- If a new USB HDD is connected at a later date, you can use the
Web-based UI to format the new HDD. This option is on the
Disk screen, accessed via the
Administration menu.
Note: Hard Disk Drives used on the Network Storage
Link are NOT compatible with any version of Windows. You cannot swap USB
HDDs between Windows and the Network Storage Link.
Return
to Top of document
Configuring Your Network Storage
Link
Now that everything is connected and powered on, you are ready to
configure your Network Storage Link so that it is accessible to the users
on your network. You will have to install the Network Storage Link Utility
on your PCs to access the Network Storage Link's Quick Setup features.
Quick Setup with the Network Storage Link
Wizard
The following procedure configures the Network Storage Link, ready for
use on your LAN.
- This procedure only needs to be done ONCE, by the Network Storage
Link's Administrator.
- Other users on the network should follow the Client PC
Setup procedure described in the following section.
- Insert the CD-ROM supplied with your Network Storage Link into your
PC's CD-ROM drive.
- The setup screen should appear after a few seconds. If it does not,
run the program SetupUtility.exe in the root (top) folder of
your CD-ROM.
- Click "Setup" to start the Setup Wizard. The Wizard will begin
scanning your network for installed Network Storage Links.
- Select the desired Network Storage Link, and click "Yes".
- You will be prompted for the Network Storage Link's password. Enter
the current password. The default value is "admin".
- Step through the Wizard, completing each screen.
- On the final screen, click "Save" to save your data to the Network
Storage Link.
The Network Storage Link is now operational.
Note:
- If the USB HDD attached to the Network Storage Link has not
previously been used by the Network Storage Link, you will be prompted
to format it. You MUST format the disk to make it usable in the Network
Storage Link, but the format operation will destroy any data on the
disk.
- The Network Storage Link's disk format is NOT compatible with
Windows. You cannot swap USB HDDs between Windows systems and Network
Storage Links.
Return
to Top of document
Other Configuration
After the configuration above, all Windows users can access the Network
Storage Link with "Guest" access rights. This allows to access to the
flash drive (if installed) and the Shared Data folder on the USB
disk.
However, we recommend creating an Network Storage Link "User" for each
person on your LAN. This will provide each person on your LAN with their
own login (name and password) as well as their own personal folder on the
Network Storage Link.
The Web-based Interface
The Web-based Interface you are now using provides access to all the
settings available in the Wizard, and is the only way to create Users,
Groups, and Shares.
- Users must be created by using the "Users" option under
"Administration". See the "Client Setup" section of this document for
details on setting up PCs to login to the Network Storage Link whenever
they start.
- Groups are groups of users. To simplify administration,
access rights (to data stored on the Network Storage Link) is assigned
to user groups, rather than individual users.
- Shares are folders on the Network Storage Link which are
visible under Microsoft networking - they can be seen in Network
Neighborhood/My Network Places.
For details on using this Web-based interface, please use the help file
for each screen.
Return
to Top of document
Client PC
Setup
Overview
Supported versions of Windows are:
- Windows 95/98/ME or later
- Windows NT 4.0, Windows 2000
- Windows XP
The following items may need to be checked or configured:
- TCP/IP protocol.
- Network Logon (Windows 95/98/ME only)
- Mapping to the Network Storage Link's storage.
TCP/IP Setup
Normally, no changes are required to each PC.
Check with your LAN administrator (or Network Storage Link
Administrator) to see if any changes are required.
Network Logon (Windows 95/98/ME only)
If using Windows 2000 or XP, ignore this section. You do not need to
make any changes to your network configuration.
If using Windows 95/98/ME, you must Logon to the Network correctly in
order to use the Network Storage Link,:
- Check your Window logon using Start - Settings - Control Panel -
Network.
Ensure the Primary Network Logon is set to
"Client for Microsoft Networks", as shown below.
Note: If this is already set, there is no need to make any
changes.
Windows Logon
- Windows will prompt you to Logon to the Network when it
boots.
You must logon.
If you press ESC, or click
Cancel, no network resources will be available. When you logon,
you need to use a valid User Name and Password.
- If the Network Storage Link Administrator has defined users on the
Network Storage Link, use the User Name and password they
supply.
- If you use a User Name and password which is not recognized
by the Network Storage Link, you can still use it, with guest
access rights. By default, this allows read/write access to the
"public" share, but the Administrator can set the guest access
rights as they wish.
Storing Files
To store files on the Network Storage Link, you should "Map" a drive
letter to each folder on the Network Storage Link folder which you wish to
access. The "Network Drive" will then be available to all Windows
programs. The procedure is as follows:
- Double-click the Network Neighborhood (or My Network
Places) icon on the desktop.
- On the "View" menu, select Details. The Comment column
will now be visible.
- Locate the Network Storage Link, as shown below. If it is not
listed, double-click Entire Network. Then double-click the
Workgroup that the Network Storage Link is in. (By default, the Network
Storage Link is in Workgroup.)

Network
Browse
- Double-click the icon for the Network Storage Link.
- Right-click a folder (directory) to which you have access, and
select Map Network Drive, as shown below.
Map Network Drive
- Select a drive letter for this folder, and check the Reconnect at
Logon checkbox. (If this is not done, the mapping will be lost when
you shut down your PC.)
Then click OK.
- This drive will now be available in Windows Explorer, and from the
File-Open or File-Save As dialog in all Windows
applications.
Note:
On Windows 95/98/ME, when you try to access a folder, you may be
prompted for a password, as shown below:
Network Resource Password Dialog
If your Windows logon name is the same as your user name on the
Network Storage Link, but the passwords are different, you can enter your
Network Storage Link password here.
But if your Windows logon name does not exist on the Network
Storage Link, you will have only guest access rights, and there
is no password which you can enter in this dialog.
Return
to Top of document
Troubleshooting
This table lists some common problems, and the solution to them.
|
Problem 1: |
The Network Storage Link Utility doesn't list any Network
Storage Links. |
|
Solution 1: |
Check the following:
- The Network Storage Link is properly installed, LAN
connections are OK, and it is powered ON.
- Ensure that your PC and the Network Storage Link are on the
same network segment. (If you don't have a router, this must be
the case.)
- Ensure that your PC has the TCP/IP network protocol loaded. In
Windows, this is done by using Control Panel-Network. If an
entry for TCP/IP -> Network card is not listed, use Add -
Protocol - Microsoft - TCP/IP to add it.
You then need to
select the new entry (TCP/IP -> Network card), click
Properties, and configure the IP Address tab.
- If your LAN has a DHCP Server, you can select "Obtain an IP
Address automatically".
- Otherwise, you must select "Specify an IP Address", and
enter values for IP Address and Subnet Mask. The
IP Address range commonly used is 192.168.1.1 to
192.168.1.254, with a Subnet Mask of 255.255.255.0. (The
Network Storage Link's default IP Address is 192.168.1.77, with
a Subnet Mask of 255.255.255.0). Remember that each device needs
a unique IP Address, and the same Subnet Mask.
|
|
Problem 2: |
Can't connect to the Network Storage Link with my Web
Browser |
|
Solution 2: |
Check that the Network Storage Link's IP Address is not
compatible with your PC. The default IP address for the Network
Storage Link is 192.168.1.77 If your LAN is using a different
address range, use the Windows utility to assign a different IP
address to the Network Storage Link. |
|
Problem 3: |
The Network Storage Link is configured, but I can't find it
in Network Neighborhood. |
|
Solution 3 |
Try using Start - Find - Computer, and enter the Network
Storage Link's name. If this does not work, use Control Panel
- Network to check the following:
- TCP/IP protocol is installed. If not, use Add - Protocol -
Microsoft - TCP/IP to install it.
- Check the network Bindings:
- Ensure the TCP/IP protocol is bound to your Network card
(NIC).
Select your Network card, click Properties, and
then the Bindings tab. If TCP/IP is not bound (checked),
check it.
- Ensure the TCP/IP -> Network card entry is bound
to the Client for Microsoft Networks service.
Select
the TCP/IP entry for your Network Card, click
Properties, and then the Bindings tab. If
Client for Microsoft Networks is not bound (checked),
check it.
- If you don't have a router, check that your IP Address is
compatible with the Network Storage Link's. (See problem 2 above.)
- If you DO have a router, check that your Gateway IP
Address is set correctly. Ask your LAN administrator for the
correct value.
|
|
Problem 4 |
When I click on the Network Storage Link icon in Network
Neighborhood, I get prompted for a password. |
|
Solution 4 |
This can happen in the following situations:
- The Logon name you used on your PC is recognized by the
Network Storage Link, but the password is not. Simply enter your
Network Storage Link password, or make your Windows password the
same as the Network Storage Link password.
- The logon name you used on your PC is NOT recognized by the
Network Storage Link, and was converted to guest, with
guest access rights. Ask the Network Storage Link
Administrator to create a user name for you. (Use the same
name as on your PC.)
- You do NOT have access permission for this share.
Ask the
Network Storage Link Administrator to grant you access.
Note: Windows 9x/ME use the Computer name, as
shown on Control Panel - Network - Identification, as the
default Logon Name. |
|